Sharing OneAPI Proxy LLM Across Multiple OpenClaw Gateways
Real-World Use Cases
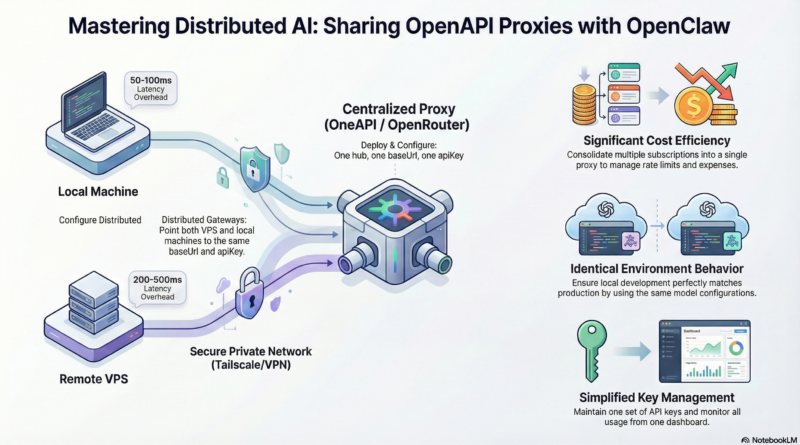
Local Development with Remote Production
Develop locally on your MacBook using the same models and configurations as your VPS deployment. No more “works on my machine” surprises when pushing to production. The shared proxy ensures identical model behavior, prompts, and responses across both environments.
Multi-User Environments
In a team setting, multiple developers can work on different OpenClaw instances (local laptops, staging servers, production VPS) all sharing the same paid API subscriptions. This dramatically reduces costs when team members need access to the same premium models.
A/B Testing and Model Switching
Use the proxy’s routing capabilities to send some requests to different models based on custom headers. This is perfect for A/B testing model performance or gradually migrating from one provider to another without changing gateway configurations.
Cost Optimization Strategies
As LLM usage grows, costs can spiral. A shared proxy enables sophisticated cost optimization:
Dynamic Model Selection: Configure your proxy to automatically route requests to the most cost-effective model that meets the quality requirements. For example:
- Simple tasks: Use Claude Haiku or GPT-4o-mini
- Medium complexity: Claude Sonnet or GPT-4o
- Complex reasoning: GPT-4 or Claude Opus
Usage Quotas: Set per-gateway quotas to prevent runaway costs from experimental scripts or misconfigured agents.
Caching Layer: Implement response caching at the proxy level for repeated queries, reducing API calls and costs while improving response times.
Failover and Reliability
If your primary LLM provider experiences downtime, the proxy can automatically failover to backup providers. Configure multiple providers in your OneAPI proxy and set fallback rules. This ensures your OpenClaw gateways remain operational even during provider outages.
Step-by-Step Example: Complete Setup with OneAPI
Let’s walk through a concrete example using OneAPI on a VPS with OpenClaw gateways.
Prerequisites
- A VPS with Docker installed (Ubuntu 22.04 or similar)
- A local MacBook with OpenClaw installed
- API keys for at least one LLM provider (OpenAI, Anthropic, etc.)
Step 1: Install and Configure OneAPI on VPS
SSH into your VPS and run:
# Clone OneAPI
sudo apt-get update && sudo apt-get install -y git docker.io docker-compose
git clone https://github.com/songquanpeng/one-api.git /opt/one-api
cd /opt/one-api

# Create data directory
mkdir -p data

# Edit configuration (you'll add your API keys here)
nano data/config.json
A minimal config.json for OpenAI:
{
  "version": "1.0.0",
  "extra": {
    "admin_emails": [
      "your-email@example.com"
    ]
  },
  "server": {
    "port": 3000,
    "host": "0.0.0.0"
  },
  "log": {
    "level": "info"
  },
  "database": {
    "provider": "sqlite",
    "name": "one-api"
  },
  "channel": "web",
  "channel_web": {
    "enable": true,
    "channel_host": "http://127.0.0.1:3000",
    "channel_web_token": "change-this-to-a-random-string"
  },
  "providers": [
    {
      "label": "OpenAI",
      "name": "openai",
      "type": "openai",
      "base_url": "https://api.openai.com/v1",
      "api_key": "sk-your-openai-api-key-here"
    }
  ],
  "models": [
    {
      "label": "GPT-4",
      "name": "gpt-4",
      "provider": "openai"
    },
    {
      "label": "GPT-4o",
      "name": "gpt-4o",
      "provider": "openai"
    },
    {
      "label": "GPT-4o-mini",
      "name": "gpt-4o-mini",
      "provider": "openai"
    }
  ]
}
Start OneAPI:
docker-compose up -d
The OneAPI admin panel will be available at http://your-vps-ip:3000. Log in with the admin email you set.
Step 2: Create API Token for OpenClaw
In the OneAPI admin panel:
- Go to “Management” → “Token”
- Click “Add Token”
- Name it “OpenClaw Gateway”
- Set unlimited usage (or set quotas based on your needs)
- Copy the generated token (it’s your `apiKey`)
Step 3: Configure VPS OpenClaw
On your VPS, edit /root/.openclaw/config.yaml:
llm:
  provider: openapi
  openapi:
    baseUrl: "http://localhost:3000/v1"
    apiKey: "the-token-you-just-copied"
    model: "gpt-4o"
    timeout: 30000
Restart OpenClaw:
openclaw gateway restart
Test it:
openclaw chat-test "Hello, this is a test from VPS"
Step 4: Configure Local MacBook OpenClaw
On your MacBook, edit ~/.openclaw/config.yaml:
llm:
  provider: openapi
  openapi:
    baseUrl: "http://your-vps-ip:3000/v1"
    apiKey: "the-same-token"
    model: "gpt-4o"
    timeout: 30000
Note: Use the VPS’s public IP or domain. If your VPS is behind a firewall, open port 3000 only to your IP or use Tailscale for a private network.
Restart your local gateway:
openclaw gateway restart
Test locally:
openclaw chat-test "Hello from MacBook"
Both gateways should now use the same underlying LLM via OneAPI.
Step 5: Secure the OneAPI Endpoint
You probably don’t want your OneAPI instance exposed to the entire internet. Secure it:
Option A – Firewall Restriction:
# On VPS, allow only your MacBook's IP
sudo ufw allow from your-macbook-ip to any port 3000
sudo ufw deny 3000
Option B – Use Nginx Reverse Proxy with HTTPS:
server {
    listen 443 ssl http2;
    server_name your-domain.com;

    ssl_certificate /path/to/cert.pem;
    ssl_certificate_key /path/to/key.pem;

    location /v1 {
        proxy_pass http://localhost:3000;
        proxy_set_header Host $host;
        proxy_set_header X-Real-IP $remote_addr;
    }
}
Then configure OpenClaw to use https://your-domain.com/v1.
Option C – Tailscale VPN:
Install Tailscale on both VPS and MacBook. Use the Tailscale IP as the baseUrl. This is the simplest and most secure, as traffic stays within the private mesh network.