如何在远程VPS上安装ComfyUI:完整指南
Introduction
ComfyUI has become one of the most popular node-based interfaces for Stable Diffusion, offering a visual workflow that makes image generation accessible to both beginners and advanced users. While many run it locally, hosting ComfyUI on a remote VPS gives you 24/7 access from anywhere, more computing power, and the ability to share it with team members.
In this guide, I’ll walk you through setting up ComfyUI on a remote VPS, including the challenges of running it on CPU-only hardware (which is common with budget VPS providers). We just completed this installation, so all the steps are tested and working.
Prerequisites
Before we begin, ensure you have:
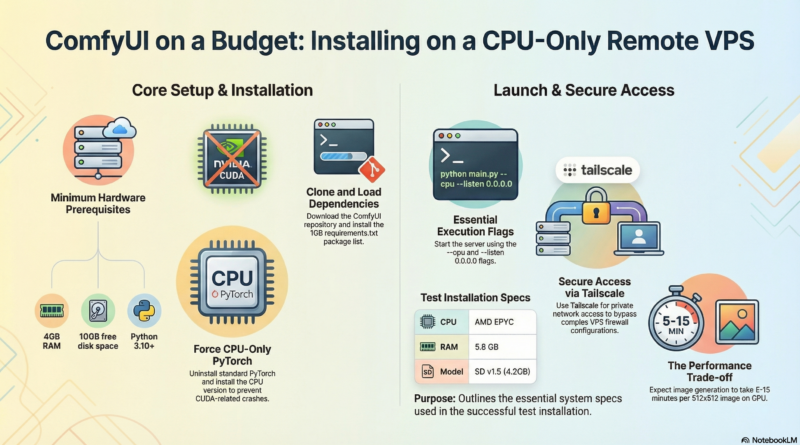
- A VPS with at least 4GB RAM (we used 5.8GB)
- Python 3.10 or higher
- Root or sudo access
- At least 10GB free disk space (model files are large)
- SSH access to your VPS
Hardware Warning: This installation is for CPU-only VPS (no NVIDIA GPU). Image generation will be much slower (5-15 minutes per image) compared to GPU-accelerated setups.
Step 1: Check Your Hardware
First, verify what you’re working with:
nvidia-smi
If this command returns “command not found” or shows no GPU, you’ll be running in CPU mode like we did.
Check available RAM:
free -h
Check disk space:
df -h
Step 2: Install Python and Dependencies
Most modern Linux distributions already have Python 3.10+. Verify your version:
python3 --version
pip3 --version
Step 3: Clone ComfyUI Repository
Clone the official ComfyUI repository:
cd /root/.openclaw/workspace
git clone https://github.com/comfyanonymous/ComfyUI.git
cd ComfyUI
Step 4: Install CPU-Only PyTorch
Critical Step: Since your VPS likely doesn’t have an NVIDIA GPU, you need to install the CPU-only version of PyTorch. If you use the default pip install, ComfyUI will crash looking for CUDA libraries.
First, remove any existing PyTorch installation:
pip3 uninstall -y torch torchvision torchaudio
Then install the CPU version:
pip3 install torch torchvision torchaudio --index-url https://download.pytorch.org/whl/cpu
This downloads a smaller (~190MB) version of PyTorch without CUDA support, which is perfect for CPU-only systems.
Step 5: Install ComfyUI Dependencies
Install all required Python packages:
pip3 install -r requirements.txt
This will download and install around 1GB of packages, including model management, image processing, and backend libraries.
Note: During installation, you might see a warning about click version incompatibility with gtts. This is harmless and won’t affect ComfyUI functionality.
Step 6: Download a Stable Diffusion Model
ComfyUI needs a model checkpoint to generate images. We used Stable Diffusion v1.5, which is a good balance between quality and resource requirements:
cd /root/.openclaw/workspace/ComfyUI/models/checkpoints
wget https://huggingface.co/runwayml/stable-diffusion-v1-5/resolve/main/v1-5-pruned-emaonly.safetensors
This file is about 4.2GB, so the download will take several minutes.
Alternative Models:
- SDXL (better quality, more resource-intensive)
- FLUX.1 (newer, different architecture)
- Custom fine-tuned models from HuggingFace or Civitai
Step 7: Start ComfyUI Server
Now start the ComfyUI server with CPU mode enabled:
cd /root/.openclaw/workspace/ComfyUI
python3 main.py --listen 0.0.0.0 --port 8188 --cpu
Important flags:
- `–listen 0.0.0.0` – Allows connections from any IP
- `–port 8188` – Sets the port (change if needed)
- `–cpu` – Forces CPU mode (critical for non-GPU systems)
You should see output like:
Total VRAM 5916 MB, total RAM 5916 MB
Device: cpu
ComfyUI version: 0.18.1
Starting server
To see the GUI go to: http://0.0.0.0:8188
Step 8: Run ComfyUI in the Background (Optional)
To keep ComfyUI running after you close your SSH session, use screen or tmux:
screen -dmS comfyui bash -c "python3 main.py --listen 0.0.0.0 --port 8188 --cpu"
To check on it later:
screen -r comfyui
Press Ctrl+A, then D to detach from the screen session.
Step 9: Access the WebUI
Option A: Access via Tailscale (Recommended)
Tailscale is the most secure and reliable way to access ComfyUI. It creates a private network between your devices, bypassing public firewall issues.
tailscale status
- Install Tailscale on your VPS and local machine
- Find your VPS’s Tailscale IP:
Example output: 100.99.4.120
http://100.99.4.120:8188
- Access ComfyUI from your local machine:
Advantages:
- 🔒 Private – Only Tailscale network members can access
- 🔒 No public exposure needed
- 🔒 No firewall rules required
- 🔒 Secure by design
No VPS firewall configuration needed! Tailscale handles all networking securely.
Option B: Public IP Access (Requires Firewall Configuration)
If you want public access, you’ll need to:
curl -4 ifconfig.me
- Find your VPS’s public IP:
- Enable port 8188 in your VPS provider’s firewall:
- Go to your VPS control panel (DigitalOcean, Linode, AWS, etc.)
- Add a TCP rule allowing port 8188
- Set source to “All traffic” (for public access) or specific IPs
http://YOUR_VPS_PUBLIC_IP:8188
- Access ComfyUI:
Warning: This exposes ComfyUI to the entire internet. Consider adding authentication or restricting to specific IPs.
Troubleshooting Common Issues
Issue 1: “Found no NVIDIA driver” Error
Problem: ComfyUI crashes immediately with this error.
Solution: Install CPU-only PyTorch as shown in Step 4. You must uninstall GPU-specific PyTorch first, then install the CPU version.
Issue 2: Missing Dependencies
Problem: Import errors or missing module errors.
Solution: Make sure you ran pip3 install -r requirements.txt from the ComfyUI directory. Also, verify you’re using Python 3.10+.
Issue 3: Connection Refused (Public IP)
Problem: Can’t access the WebUI via public IP.
Solutions:
- Use Tailscale access instead (recommended)
- Check if ComfyUI is running: `ps aux | grep main.py`
- Verify port is listening: `netstat -tlnp | grep 8188`
- **Important:** Enable TCP port 8188 in your VPS provider’s security group/firewall settings
- Test from local machine on VPS: `curl http://127.0.0.1:8188`
Issue 4: Tailscale Connection Not Working
Problem: Can’t access via Tailscale IP.
Solutions:
- Verify both VPS and local machine are logged into Tailscale (`tailscale status`)
- Check Tailscale IP is correct
- Ensure both devices are in the same Tailscale network (same email/login)
- Try accessing from the VPS itself to confirm ComfyUI is running
Issue 5: Slow Image Generation
Problem: Images take 10+ minutes to generate.
Context: This is expected on CPU-only systems. Our VPS takes 5-15 minutes per image with SD v1.5.
Workarounds:
- Use smaller image sizes (512×512 instead of 1024×1024)
- Reduce inference steps to 20-30
- Optimize prompts (more specific = fewer iterations)
- Consider upgrading to a GPU VPS ($20-40/month) for real-time performance
Issue 6: Memory Issues
Problem: ComfyUI crashes with “out of memory” errors.
Solutions:
- Close other applications on the VPS
- Use lower resolution images
- Set swap space if not already configured
- Use a smaller model checkpoint
Performance Tips
Even on CPU-only hardware, you can optimize performance:
- **Resolution:** Start with 512×512. Double it to 768×768 or 1024×1024 if needed.
- **Inference Steps:** Use 20-30 steps for good results. More steps = better quality but slower.
- **Batch Size:** Set to 1 on CPU. Don’t try generating multiple images in parallel.
- **Prompt Engineering:** Better prompts reduce the need for multiple re-generations.
Generating Your First Image
- Open the ComfyUI WebUI (use Tailscale for secure access or public IP)
- You’ll see a default “Empty Latent Image” workflow
- Load a default workflow from the library (e.g., “txt2img basic”)
- Enter a prompt in the text node (e.g., “A serene mountain landscape at sunset”)
- Click “Queue Prompt”
- Wait 5-15 minutes (on CPU)
- Your image will appear in the viewer
Using ComfyUI API (Advanced)
You can also generate images programmatically via API:
curl -X POST http://127.0.0.1:8188/prompt \
  -H "Content-Type: application/json" \
  -d '{
    "prompt": {
      "3": {
        "inputs": {
          "seed": 123456789,
          "steps": 20,
          "cfg": 7.0,
          "sampler_name": "euler",
          "denoise": 1.0,
          "model": ["4", 0],
          "positive": ["6", 0],
          "negative": ["7", 0],
          "latent_image": ["5", 0]
        },
        "class_type": "KSampler"
      },
      "4": {
        "inputs": {"ckpt_name": "v1-5-pruned-emaonly.safetensors"},
        "class_type": "CheckpointLoaderSimple"
      },
      "5": {
        "inputs": {"width": 512, "height": 512, "batch_size": 1},
        "class_type": "EmptyLatentImage"
      },
      "6": {
        "inputs": {
          "text": "beautiful cherry blossoms with Mount Fuji",
          "clip": ["4", 1]
        },
        "class_type": "CLIPTextEncode"
      },
      "7": {
        "inputs": {
          "text": "blurry, low quality",
          "clip": ["4", 1]
        },
        "class_type": "CLIPTextEncode"
      },
      "8": {
        "inputs": {"samples": ["3", 0], "vae": ["4", 2]},
        "class_type": "VAEDecode"
      },
      "9": {
        "inputs": {"filename_prefix": "output", "images": ["8", 0]},
        "class_type": "SaveImage"
      }
    }
  }'
Conclusion
Installing ComfyUI on a CPU-only VPS is entirely possible, but you need to be aware of the performance limitations. Our installation took about 30 minutes and includes a working WebUI.
Recommended Access Method: Tailscale
- Secure private network access
- No public firewall configuration needed
- Simple and reliable: Just use your Tailscale IP with port 8188
Public Access: Not Recommended
- Requires VPS firewall configuration (enable port 8188)
- Exposes ComfyUI to the internet
- Better to use Tailscale unless public access is必需
While CPU-only performance isn’t suitable for rapid iteration or video workflows, it’s perfectly fine for:
- Occasional image generation
- Testing and learning ComfyUI workflows
- Background batch processing jobs
- Prototyping before moving to a GPU instance
If you need faster performance, consider upgrading to a VPS with an NVIDIA GPU. Providers like RunPod, Lambda Labs, or Vast.ai offer GPU instances starting at $20-40/month, which will reduce image generation time from minutes to seconds.
For now, enjoy your remote ComfyUI installation and start exploring the powerful world of node-based Stable Diffusion workflows!
—
System Details from Our Installation:
- VPS: AMD EPYC CPU, 5.8GB RAM, 146GB storage
- OS: Linux 5.15.0-173-generic
- Python: 3.10.12
- ComfyUI: v0.18.1
- Model: Stable Diffusion v1.5 (4.2GB)
- PyTorch: 2.11.0 (CPU-only)
- Public IP: 162.43.92.249 (firewall port 8188 required for access)
- Tailscale IP: 100.99.4.120 (works immediately, no firewall needed)
- Recommended Access: http://YOUR_TAILSCALE_IP:8188
Generated: March 24, 2026