From Zero to Production: Complete WordPress on K3s Kubernetes with Jenkins CI/CD
Table of Contents
- Why This Guide?
- Architecture Overview
- Part 1: Setting Up K3s Kubernetes
- Part 2: Test WordPress (Non-Persistent)
- Part 3: Production WordPress (With Persistent Storage)
- Part 4: Kubernetes Dashboard
- Part 5: Jenkins CI/CD Integration
- Part 6: Connecting Jenkins to K3s
- Part 7: Scaling and Management
- Part 8: Cloud Provider Comparison
- Troubleshooting & Best Practices
Why This Guide?
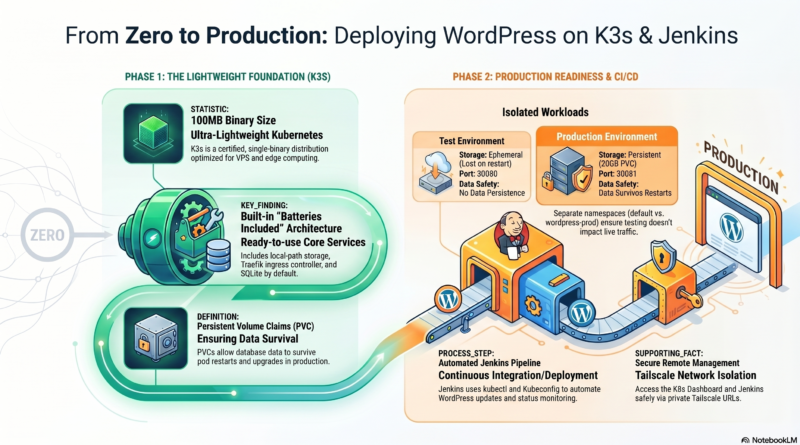
When I started learning Kubernetes, I was overwhelmed by the complexity of cloud providers like EKS, GKE, and AKS. I wanted to understand the fundamentals without spending hundreds of dollars on managed services. So I built everything on a simple VPS using K3s — a lightweight, certified Kubernetes distribution that runs in under 100MB.
What you’ll achieve by the end of this guide:
- ✅ A fully functional WordPress site running on Kubernetes
- ✅ Production instance with persistent storage (data survives restarts)
- ✅ Test instance for experiments (ephemeral storage)
- ✅ Jenkins CI/CD pipeline to manage deployments
- ✅ Kubernetes Dashboard for visual monitoring
- ✅ Secure remote access via Tailscale
Architecture Overview
text
┌─────────────────────────────────────────────────────────────────────────────┐
│                         Xserver VPS (Ubuntu 22.04)                           │
│                                                                              │
│  ┌──────────────────────────────────────────────────────────────────────┐   │
│  │                         K3s Kubernetes Cluster                        │   │
│  │                                                                       │   │
│  │  ┌─────────────────────┐  ┌─────────────────────┐  ┌───────────────┐ │   │
│  │  │  Namespace: default │  │ Namespace: wordpress│  │  Namespace:   │ │   │
│  │  │  TEST WordPress     │  │      -PROD          │  │  kubernetes-  │ │   │
│  │  │  (No PVC)           │  │  PRODUCTION WP      │  │   dashboard   │ │   │
│  │  │  Port: 30080        │  │  (With PVC - 20GB)  │  │  Port: 30082  │ │   │
│  │  │  MySQL 5.7          │  │  Port: 30081        │  │               │ │   │
│  │  │  WordPress 5.8      │  │  MySQL 8.0          │  │               │ │   │
│  │  │  Ephemeral storage  │  │  WordPress Latest   │  │               │ │   │
│  │  └─────────────────────┘  └─────────────────────┘  └───────────────┘ │   │
│  └──────────────────────────────────────────────────────────────────────┘   │
│                                    │                                         │
│  ┌─────────────────────────────────┼─────────────────────────────────────┐  │
│  │                         Jenkins CI/CD                                  │  │
│  │                         (Docker Container)                             │  │
│  │                         Port: 8081                                     │  │
│  │                         kubectl installed                              │  │
│  └─────────────────────────────────┼─────────────────────────────────────┘  │
│                                    │                                         │
│                              ┌─────▼─────┐                                   │
│                              │ Tailscale │                                   │
│                              │   VPN     │                                   │
│                              └───────────┘                                   │
└─────────────────────────────────────────────────────────────────────────────┘
Access Points:
| Service | URL | Port |
|---|---|---|
| Jenkins CI/CD | http://your-vps.tailscale.ts.net | 8081 |
| Production WP | http://your-vps.tailscale.ts.net | 30081 |
| Test WP | http://your-vps.tailscale.ts.net | 30080 |
| K8s Dashboard | https://your-vps.tailscale.ts.net | 30082 |
Part 1: Setting Up K3s Kubernetes
What is K3s?
K3s is a lightweight, certified Kubernetes distribution by SUSE Rancher. It’s packaged as a single binary under 100MB and is perfect for:
- Edge computing
- Resource-constrained environments
- Learning Kubernetes fundamentals
- Production workloads at scale
Installation
bash
# SSH into your VPS
ssh root@your-vps-ip

# Install K3s (single command)
curl -sfL https://get.k3s.io | sh -

# Verify your cluster is running
sudo kubectl get nodes

# Expected output:
# NAME             STATUS   ROLES           AGE   VERSION
# x162-43-92-249   Ready    control-plane   30s   v1.35.4+k3s1

# Configure kubectl for your user
mkdir -p ~/.kube
sudo cp /etc/rancher/k3s/k3s.yaml ~/.kube/config
sudo chown $(id -u):$(id -g) ~/.kube/config
chmod 600 ~/.kube/config
Why This Works
K3s runs as a systemd service and includes:
- Built-in local-path storage class (automatically provisions persistent volumes)
- Embedded etcd (for clusters with 3+ nodes)
- Core add-ons like Traefik ingress controller
- SQLite as default datastore (instead of etcd for single-node clusters)
Part 2: Test WordPress (Non-Persistent)
Purpose
This deployment serves as a testing sandbox. Data does NOT persist across pod restarts, making it perfect for experimenting with themes, plugins, or configuration changes without risking production data.
The YAML Explained
yaml
# wordpress-test.yaml
---
apiVersion: v1
kind: Secret
metadata:
  name: mysql-pass
type: Opaque
data:
  # 'wordpress123' base64 encoded
  password: d29yZHByZXNzMTIz

---
apiVersion: v1
kind: Service
metadata:
  name: wordpress-mysql
spec:
  ports:
  - port: 3306
  selector:
    app: wordpress-mysql

---
apiVersion: apps/v1
kind: Deployment
metadata:
  name: wordpress-mysql
spec:
  selector:
    matchLabels:
      app: wordpress-mysql
  template:
    metadata:
      labels:
        app: wordpress-mysql
    spec:
      containers:
      - name: mysql
        image: mysql:5.7
        env:
        - name: MYSQL_ROOT_PASSWORD
          valueFrom:
            secretKeyRef:
              name: mysql-pass
              key: password
        - name: MYSQL_DATABASE
          value: wordpress
        ports:
        - containerPort: 3306

---
apiVersion: v1
kind: Service
metadata:
  name: wordpress
spec:
  type: NodePort
  ports:
  - port: 80
    nodePort: 30080
    targetPort: 80
  selector:
    app: wordpress

---
apiVersion: apps/v1
kind: Deployment
metadata:
  name: wordpress
spec:
  selector:
    matchLabels:
      app: wordpress
  template:
    metadata:
      labels:
        app: wordpress
    spec:
      containers:
      - name: wordpress
        image: wordpress:5.8-apache
        env:
        - name: WORDPRESS_DB_HOST
          value: wordpress-mysql
        - name: WORDPRESS_DB_USER
          value: root
        - name: WORDPRESS_DB_PASSWORD
          valueFrom:
            secretKeyRef:
              name: mysql-pass
              key: password
        - name: WORDPRESS_DB_NAME
          value: wordpress
        ports:
        - containerPort: 80
Deployment Commands
bash
# Apply the configuration
kubectl apply -f wordpress-test.yaml

# Check deployment status
kubectl get pods
kubectl get svc

# Create database
MYSQL_POD=$(kubectl get pods -l app=wordpress-mysql -o jsonpath='{.items[0].metadata.name}')
kubectl exec $MYSQL_POD -- mysql -uroot -pwordpress123 -e "CREATE DATABASE IF NOT EXISTS wordpress;"

# Install WordPress using WP-CLI
kubectl exec deployment/wordpress -- bash -c "
cd /tmp && \
curl -sO https://raw.githubusercontent.com/wp-cli/builds/gh-pages/phar/wp-cli.phar && \
chmod +x wp-cli.phar && \
su -s /bin/bash -c 'php /tmp/wp-cli.phar core install \
  --path=/var/www/html \
  --url=\"http://your-tailscale-url:30080\" \
  --title=\"Test WordPress on K8s\" \
  --admin_user=test_admin \
  --admin_password=TestPassword123! \
  --admin_email=test@example.com' www-data
"

# Set correct site URLs
kubectl exec $MYSQL_POD -- mysql -uroot -pwordpress123 wordpress -e "
UPDATE wp_options SET option_value = 'http://your-tailscale-url:30080' WHERE option_name = 'siteurl';
UPDATE wp_options SET option_value = 'http://your-tailscale-url:30080' WHERE option_name = 'home';
"
Key Kubernetes Concepts Demonstrated
| Concept | Explanation | In This Deployment |
|---|---|---|
| Pod | Smallest deployable unit in K8s | WordPress and MySQL each run in their own pod |
| Service | Stable network endpoint for pods | wordpress service (NodePort:30080), wordpress-mysql (ClusterIP:3306) |
| Deployment | Manages pod lifecycle and scaling | Manages WordPress and MySQL pods |
| Secret | Stores sensitive data safely | MySQL root password stored as base64 |
| NodePort | Exposes service on static port | Port 30080 accessible from outside the cluster |
Part 3: Production WordPress (With Persistent Storage)
Why PVC (PersistentVolumeClaim)?
Without PVC, all database data disappears when the MySQL pod restarts. PVC ensures:
- ✅ Data survives pod failures and restarts
- ✅ Safe upgrades (can replace MySQL without data loss)
- ✅ Backup and restore capabilities
- ✅ Production-grade reliability
Creating a Separate Namespace
bash
# Isolate production from test environment
kubectl create namespace wordpress-prod

# Verify namespace created
kubectl get namespaces
Production Deployment with PVC
yaml
# wordpress-prod-pvc.yaml
---
apiVersion: v1
kind: Secret
metadata:
  name: mysql-pass
  namespace: wordpress-prod
type: Opaque
data:
  # 'SecurePassword2024!' base64 encoded
  password: U2VjdXJlUGFzc3dvcmQyMDI0IQ==

---
# PersistentVolumeClaim - Requests persistent storage
apiVersion: v1
kind: PersistentVolumeClaim
metadata:
  name: mysql-pv-claim
  namespace: wordpress-prod
spec:
  accessModes:
    - ReadWriteOnce        # Can be mounted as read-write by a single node
  resources:
    requests:
      storage: 20Gi        # Request 20GB of storage

---
apiVersion: v1
kind: Service
metadata:
  name: wordpress-mysql
  namespace: wordpress-prod
spec:
  ports:
  - port: 3306
  selector:
    app: wordpress-mysql

---
apiVersion: apps/v1
kind: Deployment
metadata:
  name: wordpress-mysql
  namespace: wordpress-prod
spec:
  selector:
    matchLabels:
      app: wordpress-mysql
  template:
    metadata:
      labels:
        app: wordpress-mysql
    spec:
      containers:
      - name: mysql
        image: mysql:8.0
        env:
        - name: MYSQL_ROOT_PASSWORD
          valueFrom:
            secretKeyRef:
              name: mysql-pass
              key: password
        - name: MYSQL_DATABASE
          value: wordpress
        ports:
        - containerPort: 3306
        volumeMounts:
        - name: mysql-persistent-storage
          mountPath: /var/lib/mysql      # Where MySQL stores data
      volumes:
      - name: mysql-persistent-storage
        persistentVolumeClaim:
          claimName: mysql-pv-claim      # Bind to the PVC

---
apiVersion: v1
kind: Service
metadata:
  name: wordpress
  namespace: wordpress-prod
spec:
  type: NodePort
  ports:
  - port: 80
    nodePort: 30081
    targetPort: 80
  selector:
    app: wordpress

---
apiVersion: apps/v1
kind: Deployment
metadata:
  name: wordpress
  namespace: wordpress-prod
spec:
  selector:
    matchLabels:
      app: wordpress
  template:
    metadata:
      labels:
        app: wordpress
    spec:
      containers:
      - name: wordpress
        image: wordpress:latest
        env:
        - name: WORDPRESS_DB_HOST
          value: wordpress-mysql
        - name: WORDPRESS_DB_USER
          value: root
        - name: WORDPRESS_DB_PASSWORD
          valueFrom:
            secretKeyRef:
              name: mysql-pass
              key: password
        - name: WORDPRESS_DB_NAME
          value: wordpress
        ports:
        - containerPort: 80
Deploy Production WordPress
bash
# Deploy to namespace
kubectl apply -f wordpress-prod-pvc.yaml

# Wait for pods to be ready
kubectl get pods -n wordpress-prod -w

# Install WordPress
kubectl exec -n wordpress-prod deployment/wordpress -- bash -c "
cd /tmp && \
curl -sO https://raw.githubusercontent.com/wp-cli/builds/gh-pages/phar/wp-cli.phar && \
chmod +x wp-cli.phar && \
su -s /bin/bash -c 'php /tmp/wp-cli.phar core install \
  --path=/var/www/html \
  --url=\"http://your-tailscale-url:30081\" \
  --title=\"Production WordPress on K8s\" \
  --admin_user=prod_admin \
  --admin_password=ProdSecurePass2024! \
  --admin_email=prod@example.com' www-data
"

# Set correct site URLs
kubectl exec -n wordpress-prod deployment/wordpress-mysql -- mysql -uroot -pSecurePassword2024! -e "
USE wordpress;
UPDATE wp_options SET option_value = 'http://your-tailscale-url:30081' WHERE option_name = 'siteurl';
UPDATE wp_options SET option_value = 'http://your-tailscale-url:30081' WHERE option_name = 'home';
"
Testing Data Persistence
bash
# Create a test post
kubectl exec -n wordpress-prod deployment/wordpress -- bash -c "
wp post create --post_title='PVC Test' --post_content='This should survive!' --post_status=publish --allow-root
"

# Restart MySQL pod (simulates failure)
kubectl delete pod -n wordpress-prod -l app=wordpress-mysql

# Wait for new pod
sleep 30

# Verify post still exists
kubectl exec -n wordpress-prod deployment/wordpress -- wp post list --allow-root
# ✅ The test post is still there - PVC is working!
Test vs Production Comparison
| Feature | Test WordPress | Production WordPress |
|---|---|---|
| Namespace | default | wordpress-prod |
| Port | 30080 | 30081 |
| Storage | Ephemeral (lost on restart) | Persistent (20GB PVC) |
| MySQL Version | 5.7 | 8.0 |
| WordPress Version | 5.8 | Latest |
| Use Case | Testing, experiments | Live production |
| Data Safety | ❌ Not safe | ✅ Safe |
Part 4: Kubernetes Dashboard
What is the Kubernetes Dashboard?
A web-based UI for managing and monitoring your Kubernetes cluster. Provides visual access to:
- All pods, deployments, and services
- Real-time logs
- Resource usage metrics
- Container shells (exec)
- Storage and configuration management
Installation
bash
# Deploy the official dashboard
kubectl apply -f https://raw.githubusercontent.com/kubernetes/dashboard/v2.7.0/aio/deploy/recommended.yaml

# Create admin user
cat > dashboard-admin.yaml << 'EOF'
apiVersion: v1
kind: ServiceAccount
metadata:
  name: dashboard-admin
  namespace: kubernetes-dashboard

---
apiVersion: rbac.authorization.k8s.io/v1
kind: ClusterRoleBinding
metadata:
  name: dashboard-admin
roleRef:
  apiGroup: rbac.authorization.k8s.io
  kind: ClusterRole
  name: cluster-admin
subjects:
- kind: ServiceAccount
  name: dashboard-admin
  namespace: kubernetes-dashboard
EOF

kubectl apply -f dashboard-admin.yaml

# Expose dashboard via NodePort
kubectl patch svc kubernetes-dashboard -n kubernetes-dashboard -p '{"spec": {"type": "NodePort", "ports": [{"port": 443, "targetPort": 8443, "nodePort": 30082}]}}'

# Generate access token
kubectl -n kubernetes-dashboard create token dashboard-admin --duration=8760h
Access the Dashboard
- URL:
https://your-tailscale-url:30082 - Login: Token authentication (paste the token from above)
- Note: Browser will show a security warning (self-signed certificate) — it’s safe to proceed
What You Can Do in the Dashboard
| Section | Capabilities |
|---|---|
| Cluster | View nodes, namespaces, resource quotas |
| Workloads | Pods, Deployments, ReplicaSets, Jobs, CronJobs |
| Services | Services, Ingresses, Network Policies |
| Storage | PersistentVolumeClaims, StorageClasses |
| Config | ConfigMaps, Secrets |
| Logs | Click any pod → Logs tab → Real-time streaming |
| Exec | Click any pod → Exec tab → Shell into container |
Part 5: Jenkins CI/CD Integration
Why Jenkins on Docker?
Running Jenkins in a Docker container provides:
- ✅ Isolation from the host system
- ✅ Easy updates (just pull a new image)
- ✅ Persistent data through Docker volumes
- ✅ No Java installation required on the host
Installation
bash
# Install Docker (if not installed)
apt update && apt install -y docker.io
systemctl start docker && systemctl enable docker

# Run Jenkins container with host network
# Using port 8081 because 8080 is often occupied
docker run -d \
  --name jenkins \
  --restart unless-stopped \
  --network host \
  -v jenkins_home:/var/jenkins_home \
  -v /var/run/docker.sock:/var/run/docker.sock \
  -v /etc/rancher/k3s:/etc/rancher/k3s:ro \
  -e JENKINS_OPTS="--httpPort=8081" \
  jenkins/jenkins:lts

# Wait for Jenkins to start (1-2 minutes)
sleep 60

# Get initial admin password
docker logs jenkins 2>&1 | grep -A 5 "Initial Admin Password"
Jenkins Initial Setup
- Access Jenkins:
http://your-tailscale-url:8081 - Enter the initial password from the logs
- Install suggested plugins (wait for completion)
- Create admin user:
- Username:
jenkins-admin - Password:
Jenkins2024!
- Username:
- Set Jenkins URL:
http://your-tailscale-url:8081
Part 6: Connecting Jenkins to K3s
Install kubectl in Jenkins Container
bash
# Install kubectl
docker exec --user root jenkins apt-get update
docker exec --user root jenkins apt-get install -y kubectl

# Verify installation
docker exec jenkins kubectl version --client
Configure Kubeconfig for Localhost Access
bash
# Create a kubeconfig that uses localhost (host networking)
cat > /tmp/kubeconfig << 'EOF'
apiVersion: v1
kind: Config
clusters:
- cluster:
    insecure-skip-tls-verify: true
    server: https://localhost:6443
  name: default
contexts:
- context:
    cluster: default
    user: default
  name: default
current-context: default
users:
- name: default
  user:
    client-certificate-data: <YOUR_CERT_DATA>
    client-key-data: <YOUR_KEY_DATA>
EOF

# Copy to Jenkins container
docker cp /tmp/kubeconfig jenkins:/var/jenkins_home/.kube/config
docker exec --user root jenkins chown jenkins:jenkins /var/jenkins_home/.kube/config
docker exec jenkins chmod 600 /var/jenkins_home/.kube/config

# Test connection
docker exec jenkins kubectl get nodes
Why Jenkins Needs Kubernetes Credentials
Without proper credentials, Jenkins cannot:
- Access the Kubernetes API
- Execute
kubectlcommands - Monitor pod status
- Manage deployments
Our kubeconfig file contains:
- Client certificate – Proves Jenkins’ identity to the cluster
- Client key – Private key for encrypted communication
- Server address – K3s API endpoint (
localhost:6443)
Sample Jenkins Pipeline
groovy
pipeline {
    agent any

    environment {
        KUBECONFIG = '/var/jenkins_home/.kube/config'
    }

    stages {
        stage('Check WordPress Status') {
            steps {
                sh 'kubectl get pods -n wordpress-prod'
                sh 'kubectl get pods -n default'
            }
        }

        stage('Restart Production') {
            steps {
                sh 'kubectl rollout restart deployment/wordpress -n wordpress-prod'
                sh 'kubectl rollout status deployment/wordpress -n wordpress-prod'
            }
        }
    }
}
Part 7: Scaling and Management
Manual Scaling
bash
# Scale OUT to 3 pods (handle more traffic)
kubectl scale deployment wordpress -n wordpress-prod --replicas=3

# Watch pods come online
kubectl get pods -n wordpress-prod -l app=wordpress -w

# Scale IN to 1 pod (save resources)
kubectl scale deployment wordpress -n wordpress-prod --replicas=1
Horizontal Pod Autoscaler (Automatic Scaling)
bash
# Install metrics server
kubectl apply -f https://github.com/kubernetes-sigs/metrics-server/releases/latest/download/components.yaml

# Create autoscaler (scales based on CPU usage)
cat << 'EOF' | kubectl apply -f -
apiVersion: autoscaling/v2
kind: HorizontalPodAutoscaler
metadata:
  name: wordpress-hpa
  namespace: wordpress-prod
spec:
  scaleTargetRef:
    apiVersion: apps/v1
    kind: Deployment
    name: wordpress
  minReplicas: 1
  maxReplicas: 5
  metrics:
  - type: Resource
    resource:
      name: cpu
      target:
        type: Utilization
        averageUtilization: 50
EOF

# Check autoscaler status
kubectl get hpa -n wordpress-prod
Backup and Restore
bash
# Backup production database
kubectl exec -n wordpress-prod deployment/wordpress-mysql -- \
  mysqldump -uroot -pSecurePassword2024! wordpress > backup-$(date +%Y%m%d).sql

# Restore from backup
kubectl exec -n wordpress-prod deployment/wordpress-mysql -- \
  mysql -uroot -pSecurePassword2024! wordpress < backup.sql
Useful Management Commands
| Command | Purpose |
|---|---|
kubectl get pods -A | List all pods in all namespaces |
kubectl logs -f deployment/wordpress -n wordpress-prod | Stream WordPress logs |
kubectl describe pod <pod-name> -n wordpress-prod | Detailed pod information |
kubectl exec -it deployment/wordpress -n wordpress-prod -- bash | Shell into WordPress container |
kubectl top pods -n wordpress-prod | Show pod resource usage |
Part 8: Cloud Provider Comparison
Where to Deploy This Architecture in Production
| Component | Current (VPS+K3s) | AWS | Google Cloud | Azure | Akamai (Linode) |
|---|---|---|---|---|---|
| Kubernetes Service | K3s (self-managed) | Amazon EKS | GKE | AKS | LKE (Linode K8s Engine) |
| Control Plane Cost | $0 (self-managed) | $0.10/hr | Free (Autopilot) | Free | Free |
| Egress Bandwidth | Varies by VPS | $0.09/GB | $0.12/GB | $0.087/GB | $0.005/GB |
| Managed Database | Self-managed MySQL | RDS / Aurora | Cloud SQL | Azure DB for MySQL | Managed Database |
| Object Storage | Local disk | S3 | Cloud Storage | Blob Storage | Object Storage (S3-compatible) |
| CDN Integration | None | CloudFront | Cloud CDN | Azure CDN | Akamai CDN (world’s largest) |
| Best For | Learning, control | AWS ecosystem | AI/ML, K8s features | Microsoft shops | Edge, cost-sensitive |
Decision Guide
| If you prioritize… | Choose… |
|---|---|
| Learning Kubernetes fundamentals | Current K3s on VPS |
| Lowest cost for small/medium workloads | Akamai LKE or Azure AKS |
| Global audience, latency-sensitive | Akamai LKE + Akamai CDN |
| AWS ecosystem (S3, Lambda, etc.) | AWS EKS |
| Latest Kubernetes features | Google GKE |
| Microsoft enterprise integration | Azure AKS |
Migration Example: From K3s to Akamai LKE
yaml
# For Akamai LKE (change only storage class and service type)
apiVersion: v1
kind: PersistentVolumeClaim
metadata:
  name: mysql-pv-claim
spec:
  storageClassName: linode-block-storage  # Changed from local-path
  # ... rest remains the same

---
apiVersion: v1
kind: Service
metadata:
  name: wordpress
  annotations:
    service.beta.kubernetes.io/linode-loadbalancer-throttle: "20"
spec:
  type: LoadBalancer  # Changed from NodePort
  # ... rest remains the same
Troubleshooting & Best Practices
Common Issues and Solutions
Issue 1: Jenkins can’t connect to K3s
bash
# Symptom: kubectl get nodes times out
# Solution: Use host networking
docker stop jenkins && docker rm jenkins
docker run -d --name jenkins --network host ...
Issue 2: WordPress shows “Database Error”
bash
# Check if database exists
kubectl exec -n wordpress-prod deployment/wordpress-mysql -- \
  mysql -uroot -pSecurePassword2024! -e "SHOW DATABASES;"

# Create if missing
kubectl exec -n wordpress-prod deployment/wordpress-mysql -- \
  mysql -uroot -pSecurePassword2024! -e "CREATE DATABASE wordpress;"
Issue 3: PVC stuck in “Pending”
bash
# Check storage class
kubectl get storageclass

# Check local-path provisioner
kubectl get pods -n kube-system | grep local-path
Issue 4: Port already in use
bash
# Find what's using the port
sudo netstat -tlnp | grep 8080

# Kill the process or use different port
sudo kill -9 <PID>
Security Best Practices
- Never commit secrets to Git
- Use Kubernetes Secrets for passwords
- Enable RBAC (Role-Based Access Control)
- Regularly rotate credentials
- Use Tailscale for network isolation
- Monitor pod security contexts
- Keep K3s and containers updated
Production Readiness Checklist
- ✅ Persistent storage configured (PVC)
- ✅ Regular backups scheduled
- ✅ Monitoring and alerting set up
- ✅ Rolling update strategy defined
- ✅ Resource limits set for all containers
- ✅ Health checks (liveness/readiness probes) configured
- ✅ Network policies for pod isolation
- ✅ SSL/TLS for external access
- ✅ Disaster recovery plan documented
Final Status Verification
bash
cat << 'EOF' > final-status.sh
#!/bin/bash
echo "╔══════════════════════════════════════════════════════════════╗"
echo "║     WordPress on K3s with Jenkins CI/CD - Final Status      ║"
echo "╚══════════════════════════════════════════════════════════════╝"
echo ""
echo "🎯 K3s Cluster:"
kubectl get nodes
echo ""
echo "🎨 Production WordPress (Port 30081 - with PVC):"
kubectl get pods -n wordpress-prod
echo ""
echo "🧪 Test WordPress (Port 30080 - ephemeral):"
kubectl get pods -n default
echo ""
echo "💾 Persistent Storage:"
kubectl get pvc -n wordpress-prod
echo ""
echo "🔧 Jenkins Status:"
docker ps | grep jenkins
echo ""
echo "╔══════════════════════════════════════════════════════════════╗"
echo "║                      Access URLs                            ║"
echo "╠══════════════════════════════════════════════════════════════╣"
echo "║ Jenkins CI/CD:      http://your-tailscale-url:8081          ║"
echo "║ Production WP:      http://your-tailscale-url:30081         ║"
echo "║ Test WP:            http://your-tailscale-url:30080         ║"
echo "║ K8s Dashboard:      https://your-tailscale-url:30082        ║"
echo "╚══════════════════════════════════════════════════════════════╝"
EOF

chmod +x final-status.sh
./final-status.sh
Conclusion
You’ve successfully built a complete WordPress infrastructure on Kubernetes!
What you’ve accomplished:
- ✅ K3s Kubernetes cluster running on a VPS
- ✅ Two WordPress instances (test + production)
- ✅ Persistent storage for production database
- ✅ Kubernetes Dashboard for visual management
- ✅ Jenkins CI/CD pipeline with kubectl integration
- ✅ Secure remote access via Tailscale
- ✅ Understanding of YAML, PVCs, Deployments, and Services
Key Takeaways:
- Kubernetes skills are transferable across all cloud providers
- Persistent storage is essential for production databases
- CI/CD pipelines automate deployment and management
- Namespaces provide isolation between environments
- Understanding fundamentals first makes cloud adoption easier
Next Steps:
- Set up SSL/HTTPS with Let’s Encrypt
- Configure automated backups
- Add monitoring with Prometheus + Grafana
- Implement GitOps with ArgoCD
- Set up alerting for pod failures
Additional Resources
- Kubernetes Documentation
- K3s Documentation
- Jenkins Pipeline Documentation
- Tailscale Documentation
- WordPress on Kubernetes Best Practices
*This guide was compiled from a complete production deployment of WordPress on K3s, including test and production environments, persistent storage, and CI/CD integration with Jenkins.*