From Containers to Cloud: Understanding Kubernetes Concepts by Deploying WordPress on AWS
If you’ve been anywhere near the world of modern software development, you’ve heard the buzzwords: Docker, Pods, Nodes, Kubernetes (K8s). They sound powerful, but also a bit abstract. What exactly is a Pod? How does a container turn into a running application on the internet? The best way to learn is by doing. So today, we’re going to bridge the gap between theory and practice. First, we’ll demystify the core concepts of Kubernetes. Then, we’ll use those very concepts to deploy a real-world application—WordPress—on AWS. Let’s turn abstract terms into a working blog.
Part 1: The Zoo of Concepts (Made Simple)
Before we touch the cloud, let’s establish a mental model for the key technologies.
Docker: The Shipping Container
Think of Docker as the technology for standardized packaging. It takes your application (WordPress code, PHP, Apache) and all its dependencies (libraries, config files) and packs them into an isolated unit called a container.
Analogy: A shipping container. It standardizes cargo so it can be moved by any ship, truck, or train.
Why it matters: A Docker container runs the same way on your laptop, a test server, or in the cloud.
Pod: The “Pea Pod” (K8s’ smallest unit)
Docker runs containers, but Kubernetes rarely runs a container all by itself. It runs a Pod. A Pod is a wrapper that can hold one or more tightly-coupled containers.
Analogy: A pea pod. Most pods have one pea (one main container), but sometimes you have multiple peas (a main container + a helper container) sharing the same shell.
Key feature: All containers inside a Pod share the same network IP and storage. They can talk to each other via localhost.
Node: The Worker Machine
A Node is simply a machine (a virtual or physical server) where Pods live. In AWS, a Node is an EC2 instance.
Analogy: The floor of a warehouse. The warehouse floor (Node) has a certain amount of space, power, and memory. You place your pea pods (Pods) onto that floor to run.
Components: Each Node runs a container runtime (like Docker) and a kubelet (the “node manager” that reports back to the boss).
Kubernetes (K8s): The Orchestrator
Kubernetes (K8s for short) is the boss that manages all your Nodes and Pods.
Analogy: The warehouse logistics manager. It decides which Pod goes to which Node, restarts Pods if they crash, scales up the number of Pods during traffic spikes, and rolls out updates without taking your site down.
Simple definition: K8s automates the deployment, scaling, and management of containerized applications.
Part 2: The Live Demo – Deploying WordPress on AWS EKS
Now, let’s use those concepts. We will deploy WordPress on Amazon EKS (Elastic Kubernetes Service).
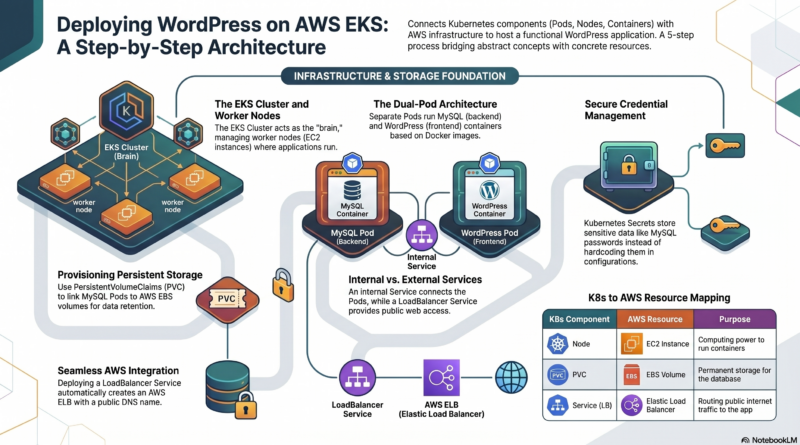
Step 1: The Foundation (Nodes and Cluster)
First, we need the hardware. On AWS, we create an EKS Cluster (the Kubernetes brain) and add Node Groups (EC2 instances).
Concept Check: These EC2 instances are our Nodes. They will do the heavy lifting of running our WordPress and MySQL containers.
Step 2: Persistent Storage (For MySQL)
Containers are ephemeral (they disappear when restarted). Databases are not. We need a PersistentVolume.
Action: We create an AWS EBS volume (Elastic Block Store) and tell Kubernetes to reserve it using a PersistentVolumeClaim (PVC).
Concept Check: This PVC is the “hard drive” we will plug into our MySQL Pod.
Step 3: Deploy MySQL (The Database)
We need to run the database securely.
The Secret: We create a Kubernetes Secret object to hold the MySQL root password (encoded in base64).
The Pod and Deployment: We write a YAML file for a Deployment (which manages Pods). This Deployment creates a Pod. Inside that Pod, a Docker container running mysql:8.0 is started.
The Service: We create an internal Service named wordpress-mysql. This gives our database a permanent IP and DNS name inside the cluster.
Concept Check: The Pod holds the MySQL container. The Service lets WordPress find it. The PVC provides persistent storage.
# Simplified version of what the MySQL deployment looks like
apiVersion: v1
kind: Secret
metadata:
  name: mysql-pass
data:
  password: eW91ci1wYXNzd29yZA==
---
apiVersion: v1
kind: Service
metadata:
  name: wordpress-mysql
spec:
  ports:
    - port: 3306
  selector:
    app: wordpress
---
apiVersion: apps/v1
kind: Deployment
metadata:
  name: wordpress-mysql
spec:
  selector:
    matchLabels:
      app: wordpress
  template:
    spec:
      containers:
        - image: mysql:8.0
          name: mysql
          env:
            - name: MYSQL_ROOT_PASSWORD
              valueFrom:
                secretKeyRef:
                  name: mysql-pass
                  key: password
          volumeMounts:
            - name: mysql-storage
              mountPath: /var/lib/mysql
      volumes:
        - name: mysql-storage
          persistentVolumeClaim:
            claimName: mysql-pv-claim
Step 4: Deploy WordPress (The Frontend)
Now for the main application.
The ConfigMap: We use a ConfigMap (or just environment variables) to tell WordPress: “Your database host is wordpress-mysql.”
The Pod and Deployment: We create another Deployment. This creates a Pod running a Docker container from wordpress:latest.
The Public Service: We create a Service of type: LoadBalancer. On AWS, this automatically provisions an Application Load Balancer (ALB) and gives it a public URL.
Concept Check: The WordPress Pod connects to the MySQL Pod using the internal Service name. The LoadBalancer Service exposes the WordPress Pod to the internet.
# Simplified WordPress Deployment and Service
apiVersion: v1
kind: Service
metadata:
  name: wordpress-public
spec:
  type: LoadBalancer  # This creates an AWS ALB
  ports:
    - port: 80
      targetPort: 80
  selector:
    app: wordpress
---
apiVersion: apps/v1
kind: Deployment
metadata:
  name: wordpress
spec:
  template:
    spec:
      containers:
        - image: wordpress:latest
          name: wordpress
          env:
            - name: WORDPRESS_DB_HOST
              value: wordpress-mysql  # Connects to the MySQL Service
            - name: WORDPRESS_DB_PASSWORD
              valueFrom:
                secretKeyRef:
                  name: mysql-pass
                  key: password
          ports:
            - containerPort: 80
Step 5: See it Live
Run the magic command:
kubectl get services wordpress-publicWait for the EXTERNAL-IP to go from pending to a real address (like a1b2c3d4e5f6-1234567890.us-east-1.elb.amazonaws.com). Copy that URL into your browser.
Welcome to the famous WordPress 5-minute installation screen! Your blog is now running inside a Docker container, managed by a Pod, scheduled on a Node, orchestrated by Kubernetes, and exposed to the world by an AWS Load Balancer.
Conclusion: The Power of Abstraction
Today, you saw the entire lifecycle: Docker packaged the app (WordPress + MySQL). Pods hosted those containers. Nodes provided the raw compute power (EC2 instances). Kubernetes orchestrated everything, from secrets to networking to auto-healing. AWS provided the underlying cloud infrastructure (EBS, ELB, EKS).
By understanding these five layers, you can now deploy almost any application at scale. The concepts remain the same whether you are running one blog or managing thousands of microservices for a Fortune 500 company.