在VPS上通过Tailscale部署OpenClaw Web服务器
Serve Your OpenClaw Workspace on VPS with Tailscale
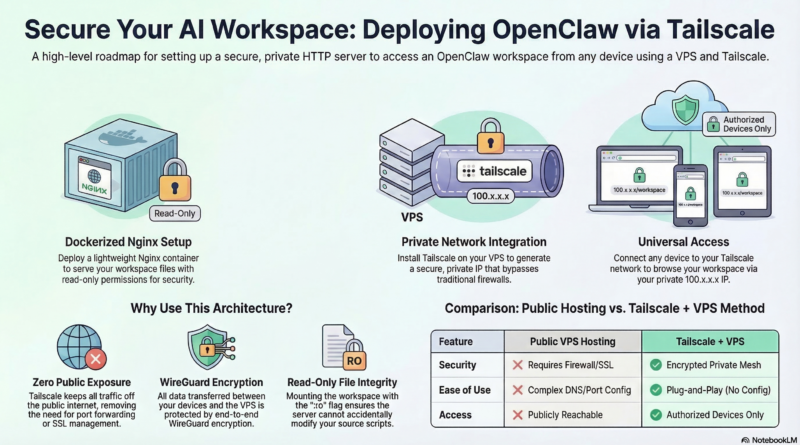
As an OpenClaw power user, you’ve got a workspace full of skills, scripts, blog posts, and projects. But what if you could browse it all from any device, anywhere in the world? In this guide, I’ll show you how to set up a lightweight HTTP server on your VPS and access it securely through Tailscale.
Why This Setup Matters
Your OpenClaw workspace is the heart of your AI-powered workflow. Organizing files is great, but being able to quickly browse drafts, review images, and check scripts from your phone or laptop makes it truly useful. With Docker and Tailscale, we can create a secure, always-accessible workspace server in minutes.
Prerequisites
Before we start, make sure you have:
- A VPS running Linux (Ubuntu, Debian, etc.)
- Docker and Docker Compose installed
- Tailscale installed on both your VPS and the device you’ll browse from
- Root or sudo access on your VPS
Step 1: Organize Your Workspace
If your workspace is cluttered, take a moment to organize it. A clean structure makes browsing easier:
~/.openclaw/workspace/
├── blog/           # Drafts, published posts, images
├── projects/       # Standalone projects
├── skills/         # OpenClaw skills
├── scripts/        # Python automation scripts
├── tools/          # Tools and configs
├── memory/         # Daily notes and memories
└── index.html      # Landing page
Step 2: Create a Docker Compose File
We’ll use nginx in a Docker container for serving files. Create `docker-compose.workspace-server.yml` in your workspace:
“`yaml
version: ‘3.8’
services:
workspace-server:
image: nginx:alpine
container_name: openclaw-workspace-server
restart: unless-stopped
ports:
– “8000:80”
volumes:
– /root/.openclaw/workspace:/usr/share/nginx/html:ro
– ./default.conf:/etc/nginx/conf.d/default.conf:ro
The `:ro` (read-only) flag is important—it ensures the server can't accidentally modify your files.

## Step 3: Configure Nginx

Create a custom nginx configuration file named `default.conf`:

```nginx
server {
    listen       80;
    listen  [::]:80;
    server_name  localhost;

    # Enable directory listing for easier browsing
    autoindex on;
    autoindex_exact_size off;
    autoindex_localtime on;

    # Set proper charset
    charset utf-8;

    # Serve all files from workspace root
    location / {
        root   /usr/share/nginx/html;
        index  index.html index.htm index.md;
        try_files $uri $uri/ =404;
    }

    # Deny access to git and hidden files
    location ~ /\. {
        deny all;
        access_log off;
        log_not_found off;
    }

    # Deny access to .git directory
    location ^~ /.git/ {
        deny all;
        access_log off;
        log_not_found off;
    }
}
This configuration:
- Enables directory listing so you can browse folders
- Sets `index.html` as the default landing page
- Blocks access to `.git` and hidden files for security
Step 4: Create a Landing Page
Create `index.html` in your workspace root directory:
💻 My Workspace
Customize the name and descriptions to match your workspace!

## Step 5: Start the Server

Run the following command from your workspace directory:

```bash
docker compose -f docker-compose.workspace-server.yml up -d
The server will start automatically and restart if it crashes.
Step 6: Find Your Tailscale IP
On your VPS, run:
“`bash
ip a | grep -A 2 “tailscale” | grep “inet ” | awk ‘{print $2}’ | cut -d/ -f1
You'll see an output like `100.x.x.x`. That's your Tailscale IP.

## Step 7: Access Your Workspace

From any device connected to Tailscale, open your browser and navigate to:
http://YOUR_TAILSCALE_IP:8000
You should see your landing page with cards linking to each directory. Click around, browse your files, and enjoy having your workspace available everywhere!

## Security Considerations

This setup is designed to be secure:

1. **Tailscale encryption**: All traffic is encrypted end-to-end using WireGuard
2. **Read-only access**: The nginx container mounts files as read-only
3. **Hidden files blocked**: The configuration denies access to `.git` and hidden files
4. **Private network**: Tailscale keeps traffic off the public internet

## Why Tailscale Instead of Public IP?

Using Tailscale has several advantages over exposing a public IP:

- **No port forwarding needed**: Works behind NAT and firewalls
- **Built-in encryption**: WireGuard protects all traffic
- **Access control**: Only devices you approve can connect
- **No DNS setup**: Use the IP directly or set up Tailscale MagicDNS
- **Secure by default**: No public internet exposure

## Advanced: Multiple Workspaces

If you have multiple workspaces, you can run multiple servers on different ports:

```yaml
ports:
  - "8001:80"
Just update the port mapping and configuration for each workspace.
Troubleshooting
Can’t access the server:
- Verify Tailscale is running on both devices: `tailscale status`
- Check the container is running: `docker ps`
- Test locally: `curl http://localhost:8000`
Container keeps restarting:
- Check logs: `docker logs openclaw-workspace-server`
- Verify the workspace path is correct
- Ensure the `default.conf` file exists
Port blocked by ISP:
- Try a different port (8001, 8081, etc.)
- Remember to update the port mapping in docker-compose.yml
Conclusion
With just a few files and Docker Compose, you’ve turned your OpenClaw workspace into a browsable, accessible environment. Whether you’re reviewing blog drafts from your phone, checking scripts on a tablet, or sharing work with a team member across the globe, your workspace is now just a click away.
The beauty of this setup is its simplicity—no complex firewall rules, no SSL certificates to manage, no DNS configuration. Tailscale handles the networking, Docker handles the serving, and you handle the creativity.
Happy workspace browsing! 🚀